Looking for a way to connect Gravity Forms to Google Sheets?
Google Sheets is a web-based collaborative tool. Connecting your Gravity Forms to Google Sheets lets you automate and manage your form entries in real-time. Since Google Sheets is a web-based tool; you can only integrate it with WordPress contact forms by adding custom code.
If you’re a beginner and looking for an easy tool to connect your WordPress forms to Google Sheets, WPSyncSheets has got you covered!
WPSyncSheets is a powerful WordPress plugin that lets you connect your Gravity Forms with Google Sheets – without any fuss. This plugin works as a connector for Gravity Forms, allowing you to save your Gravity Forms entries in Google Sheets.
In this guide, we’ll walk you through the process of connecting Gravity Forms with Google Sheets using the WPSyncSheets For Gravity Forms plugin.
So let’s get started!
Why Link WordPress Forms to Google Sheets?
Gravity Forms is a powerful WordPress plugin that allows website owners to create and manage custom forms.
However, once the forms are submitted, the data is stored within the WordPress database. If you need to analyze or use the data in other ways, you’ll have to manually export it to a spreadsheet, which can be time-consuming and prone to errors.
Fortunately, there is a solution to this problem. By connecting WordPress Forms with Google Sheets, you can automatically save all form submissions to a spreadsheet and manage your data more efficiently.
The following are some of the other advantages of linking WordPress forms to Google Sheets:
- Data collection and management: By connecting your WordPress forms to Google Sheets, all your form submissions are automatically added to a Google Sheet. This makes it easy to collect, manage, and analyze data from form submissions in one central location. You can easily sort, filter, and analyze data to gain insights and make informed decisions.
- Easy Collaboration: Since Google Sheets is a cloud-based platform, multiple users can access the same sheet simultaneously. This can help teams collaborate effectively on form submissions, work on the same data set, and share feedback and insights.
- Automated data processing: With Google Sheets, you can automate the processing of form submissions. You can set up rules to sort, filter, and highlight specific data types, making prioritizing and managing form submissions easier.
- Real-time reporting: Google Sheets allows you to create charts and graphs that update in real-time as new data is added. This can help you visualize trends, track progress, and make data-driven decisions.
- Accessibility: Google Sheets is accessible from any device with an internet connection. You can access your form submissions anywhere, anytime, and on any device. This can help you stay on top of form submissions, even when you’re away from your computer.
How to Connect Gravity Forms to Google Sheets using WPSyncSheets?
Before we proceed, let’s first see some notable features of WPSyncSheets for Gravity Forms:
- Automatically Creates Google Spreadsheets
WPSyncSheets For Gravity Forms automatically creates Google Spreadsheets to manage all your Gravity Forms data. The data will be automatically added to the spreadsheet whenever a form submission is received. You don’t have to create new sheets or copy and paste data manually.
- Instantly Sync all of your Gravity Forms data to Google Spreadsheets
WPSyncSheets For Gravity Forms instantly syncs all your Gravity Forms data to Google Spreadsheets. This means you can access the latest data in real-time without manually refreshing the spreadsheet. This feature saves you time and makes your work more automated and efficient.
- Auto-generate and display the Entry ID for the form submissions in the Google Spreadsheets
WPSyncSheets For Gravity Forms auto-generates and displays the Entry ID for the form submissions in the Google Spreadsheets. This makes it easier to manage your data and track the progress of each form submission. You can also use the Entry ID to link to the original form submission in Gravity Forms.
- Retrieve form data and display the payment column once the payment has been received and approved
WPSyncSheets For Gravity Forms only retrieves form data and displays the payment column once the payment has been received and approved. This feature ensures that your spreadsheet is updated only when payments are confirmed. You don’t have to worry about incomplete data or errors in your spreadsheet.
- Flexible options to control your spreadsheet directly from the plugin settings page
With WPSyncSheets For Gravity Forms, you get flexible options to control your spreadsheet directly from the plugin settings page. You can view, clear, and download spreadsheets from the settings area without switching tabs or opening your Google drive, making it easier to manage your data and keep everything organized.
- Freeze the first row/header of the sheet from the plugin settings page
WPSyncSheets For Gravity Forms has an option that allows you to freeze the first row/header of the sheet from the plugin settings page. This feature helps keep the column headers visible when you scroll down the sheet. It’s a minor feature, but it can make a big difference in usability.
- Simple mapping of form fields to Google spreadsheets
WPSynchSheets makes mapping your form fields to Google spreadsheets simple. When data is inserted from the form.
- User-friendly plugin
WPSyncSheets For Gravity Forms is a completely user-friendly plugin. You only need to configure the plugin once, and you’re good to go. You don’t need to worry about complex settings or configurations. Once the plugin is set up, it will run automatically in the background.
Let’s see how you can connect WordPress Forms to Google Sheets using WPSyncSheets.
Step 1: Install WPSyncSheets for Gravity Forms
WPSyncSheets for Gravity Forms offers both the Lite and Premium version of its plugin.
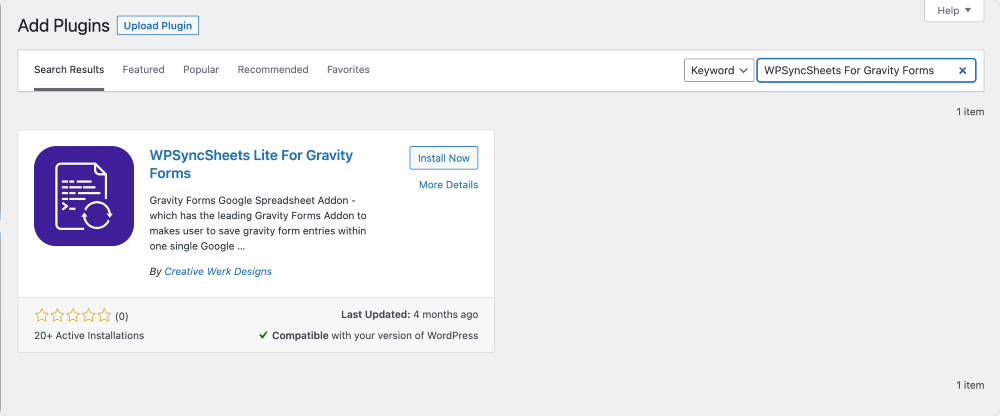
You can download WPSyncSheets For Gravity Forms Lite from the WordPress plugin repository or install it from your WordPress dashboard.
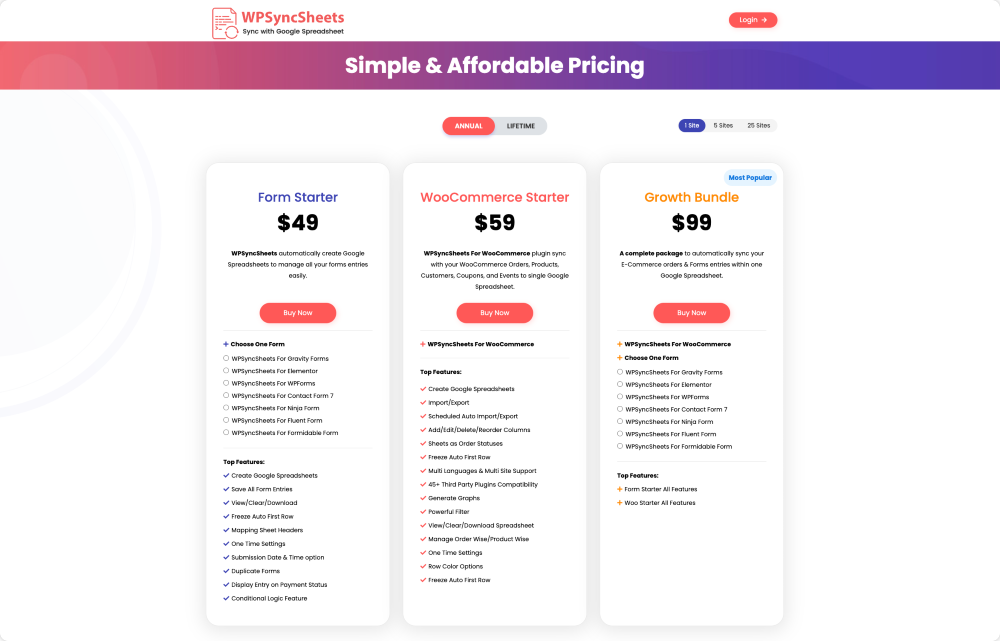
To get the premium version of WPSyncSheets for Gravity Forms, go to the plugin’s official pricing page, choose your plan, purchase, and install the plugin on your WordPress site.
Step 2: Connect WPSyncSheets For Gravity Forms with Your Google Account
In order to connect WPSyncSheets For Gravity Forms with your Google account, you will need to create a Google API key and an OAuth 2.0 client ID.
To do that, go to the Google Developer Console and click on the CREATE PROJECT or select an existing project from the Select the Project section.
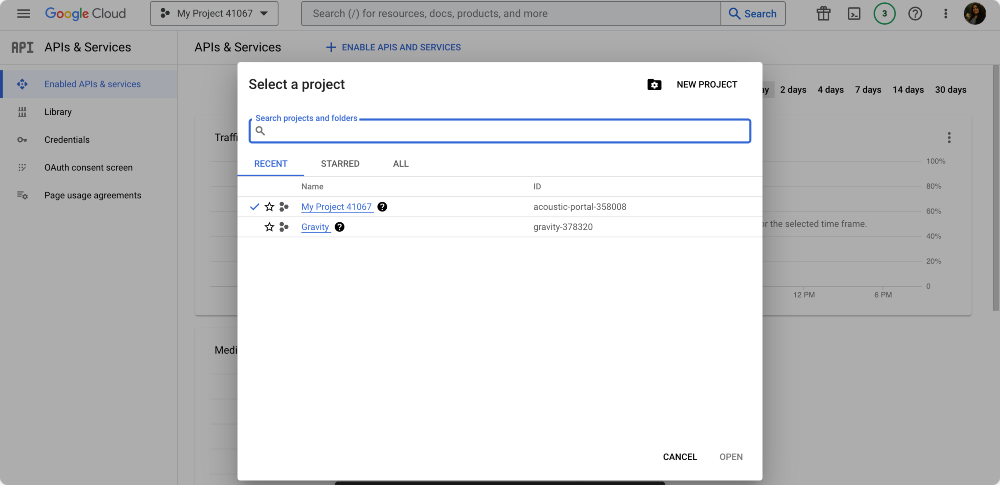
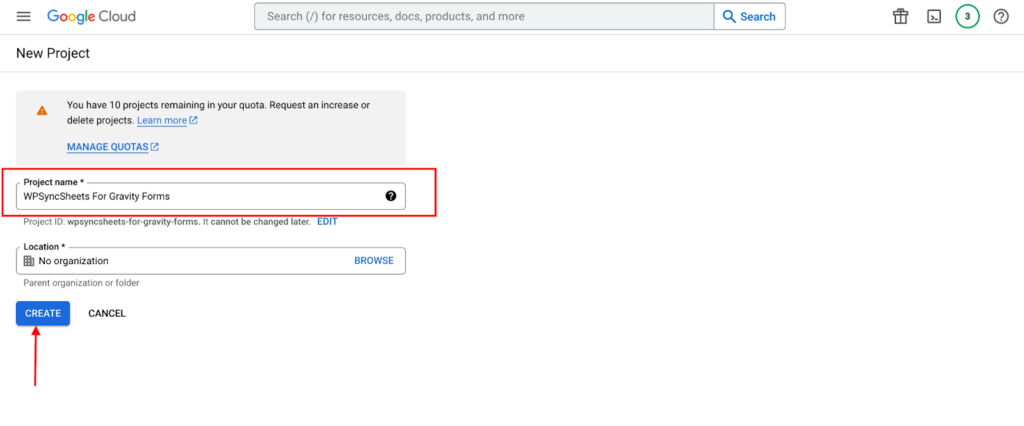
Enter your preferred Project Name on the next page, and click the Create button.
Next, you need to enable APIs and services for the newly created project.
You can do that by clicking Enable APIs & Services on the project page.
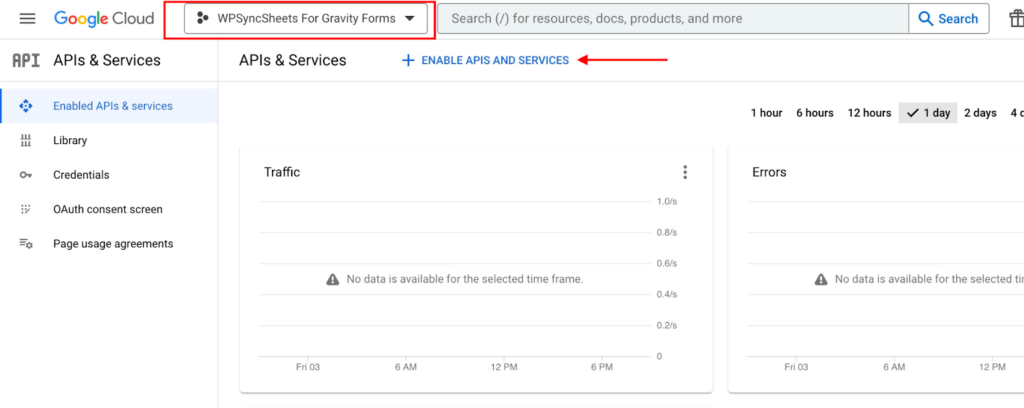
This will open the Google API library. Search for the Google Drive API, and click the ENABLE button.

On the next page, again click on the Library tab.

Clicking this will again open the Google API library. Search for the Google Sheets API, and click the ENABLE button.

Great, you’ve successfully enabled Google Drive and Google Sheets API.
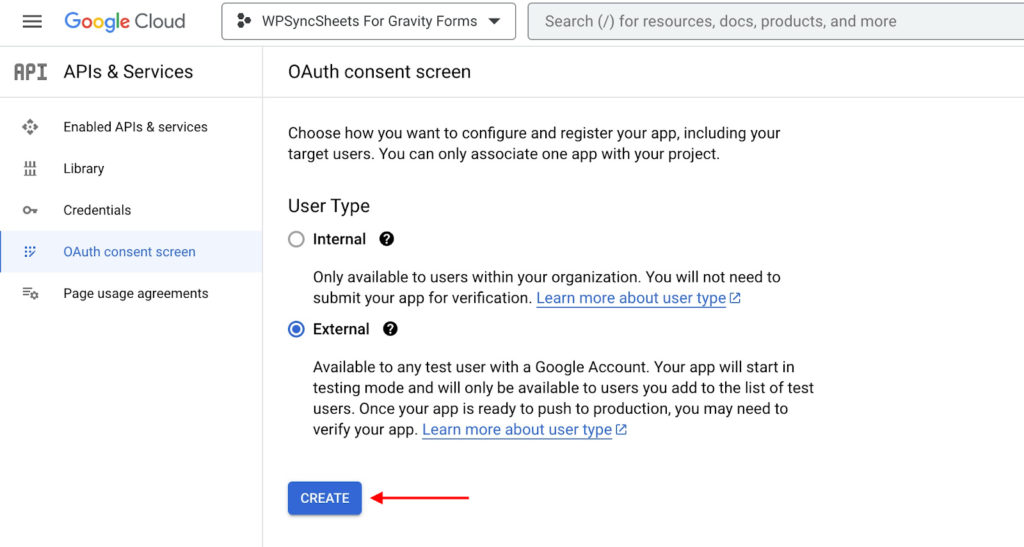
Next, in the project dashboard, click OAuth Consent Screen and select External as user type and click on the blue Create button.
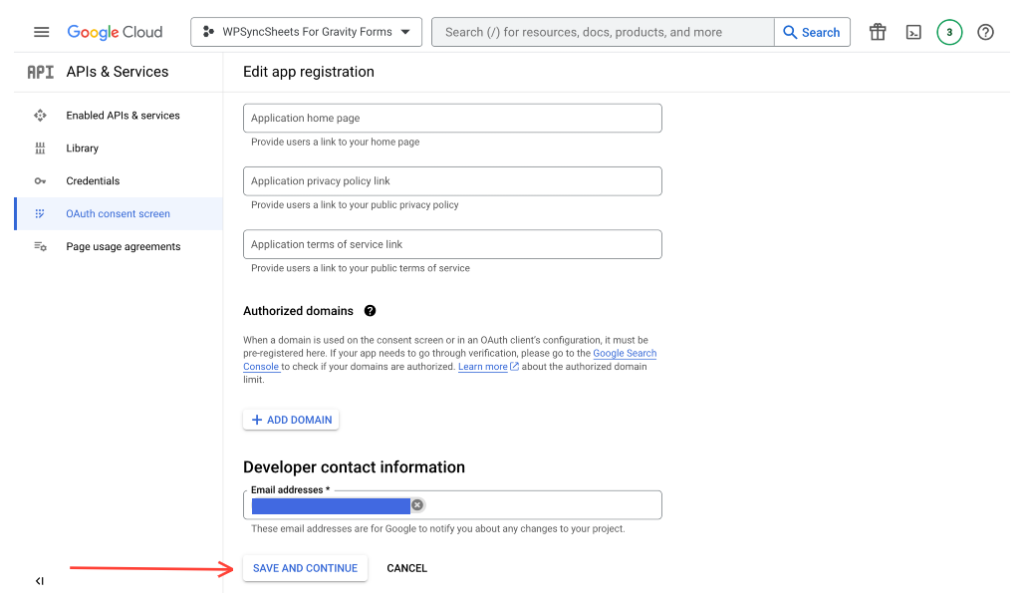
Next, you need to add App information and fill in some mandatory details. This is a simple 4-step process.
In the first step, you need to add your App and Developer related information, such as your App Name, User support email, Developer email, and more.
Once you add all the necessary details, click the SAVE AND CONTINUE button.
On the next page, you get options to add or remove scopes.
Scopes describe the permissions you require users to authorize for your app and the type of private information from a user’s Google Account you can access.
Once you check the option here, click SAVE AND CONTINUE.
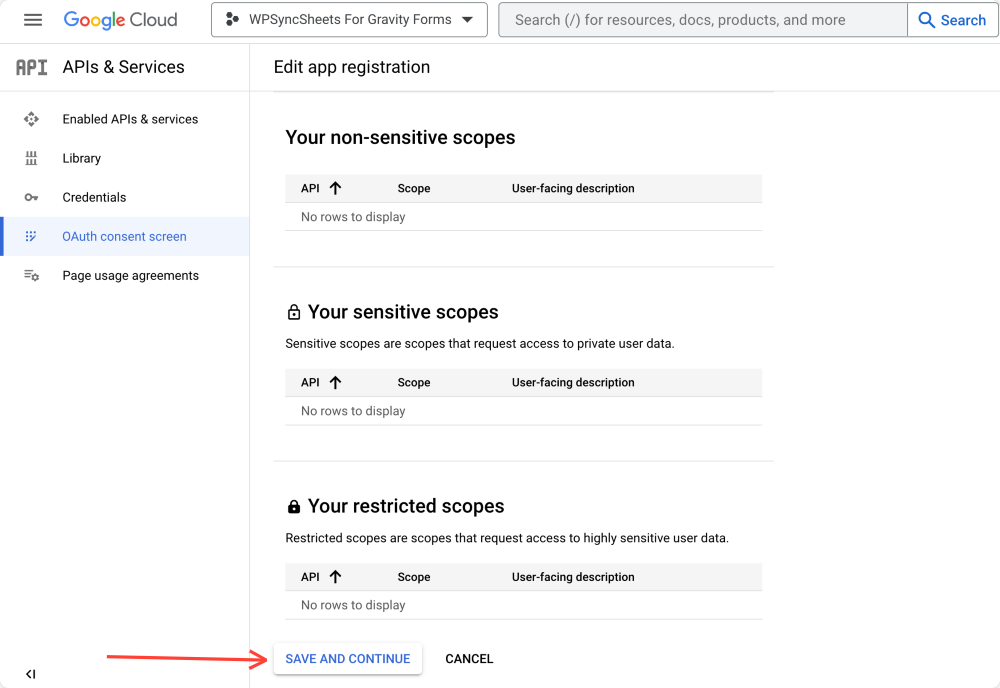
Check the further option, and click SAVE AND CONTINUE.
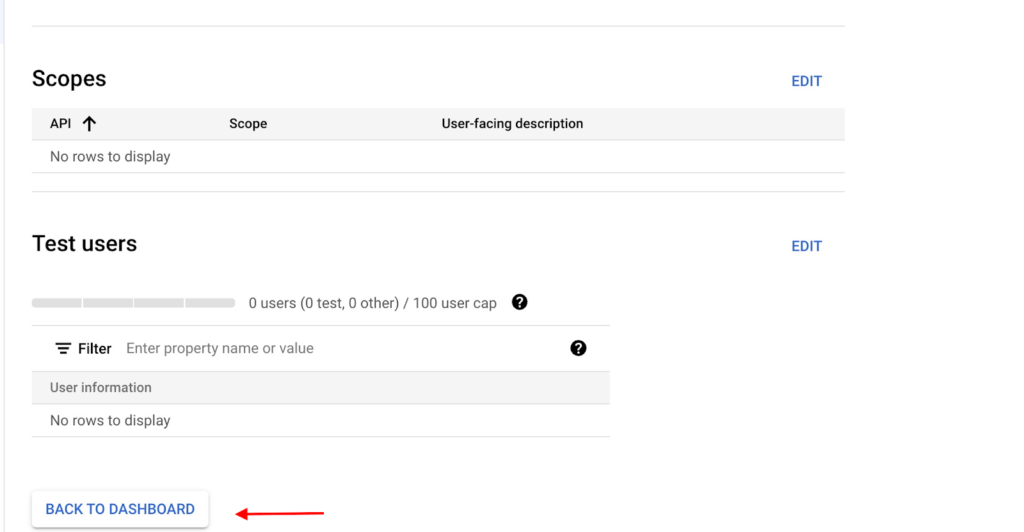
Once complete the process, lastly, click the BACK TO DASHBOARD button.
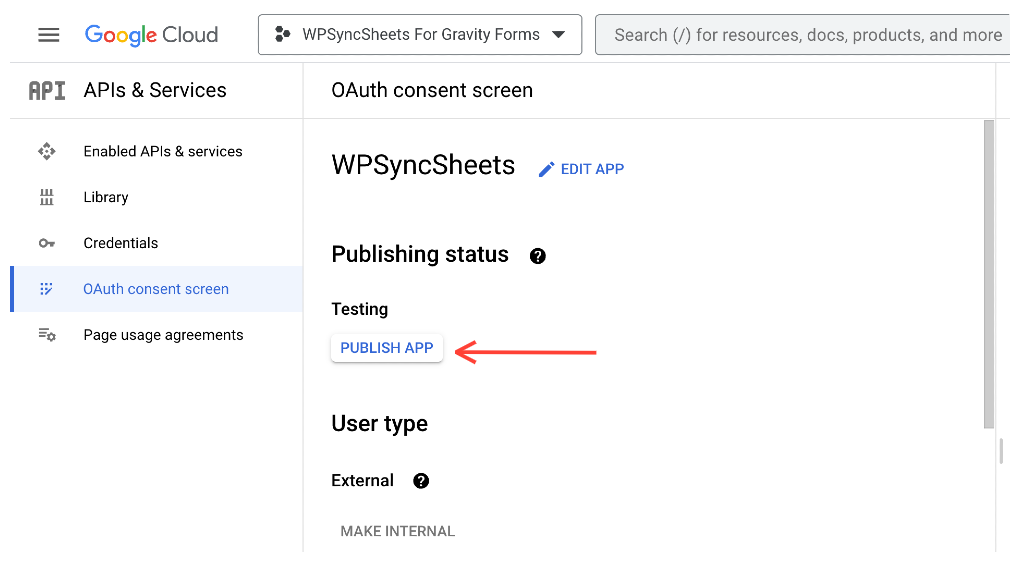
On the next screen, click on the PUBLISH APP button.
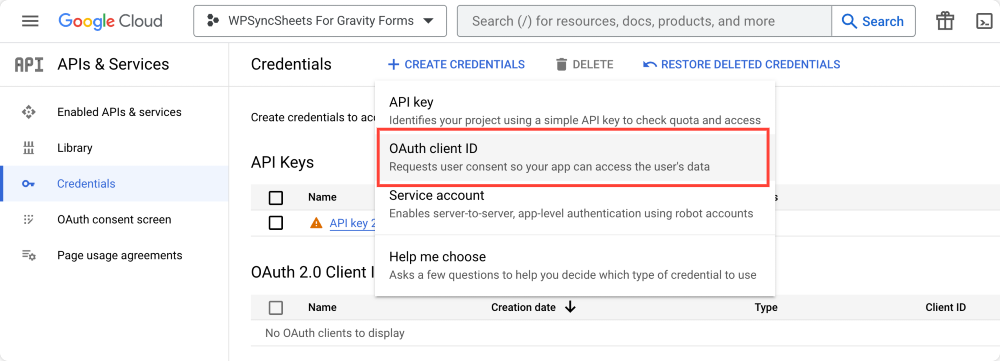
Next, navigate to the Credentials tab and click on it to create new credentials.
Click on + CREATE CREDENTIALS on the next page and select the OAuth client ID option.
On the next screen, Select Web application as the application type.
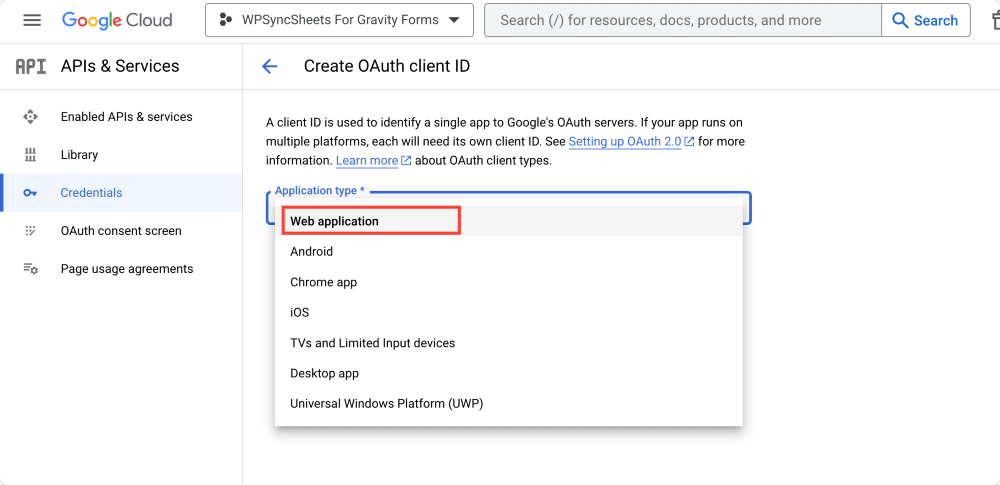
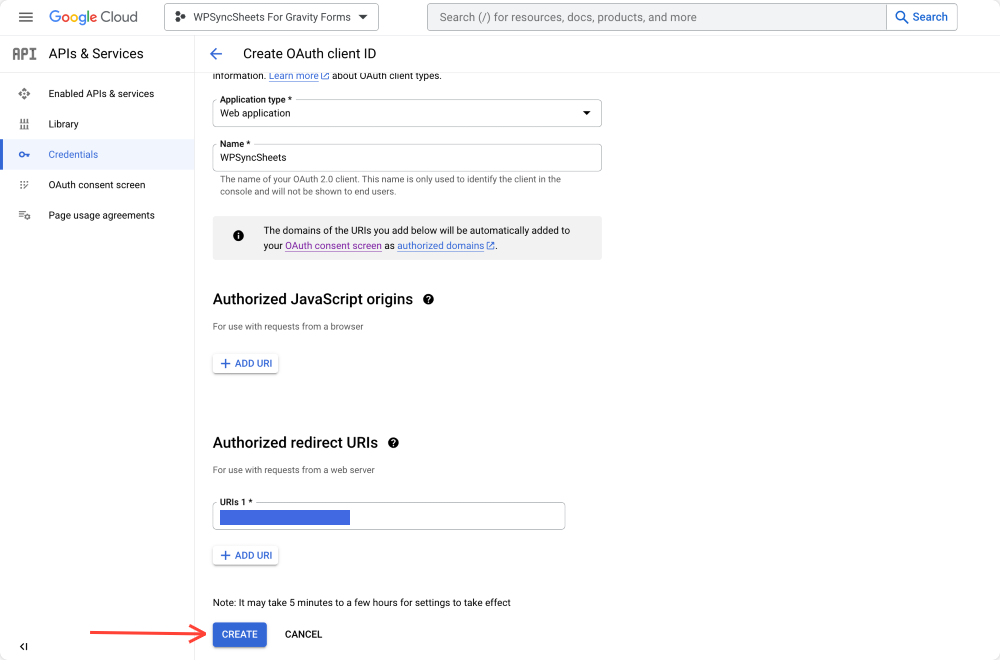
Enter your application name in the Name* tab and add your website URL in the Authorized redirect URIs section.
Once you add all the details, click on the Create button.
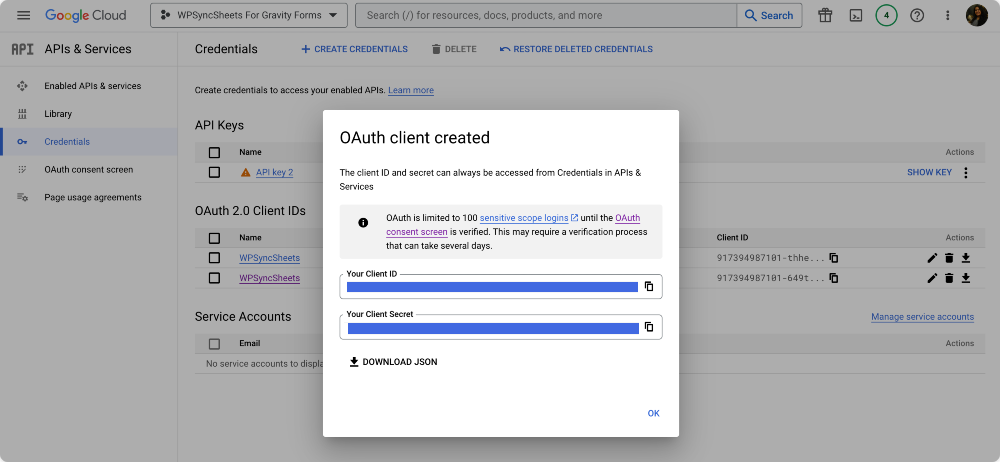
When you click the Create button, a popup window will appear with your Client ID and Client Secret.
Copy the keys and head back to your WordPress website.
Step 3: Add Google Sheet API Keys to WPSyncSheets Settings
Click on the WPSyncSheets For Gravity Forms settings page in your WordPress dashboard. This will open the Google Sheets API tab.
Paste the Client ID and Client Secret in the respective fields and click the Save button.
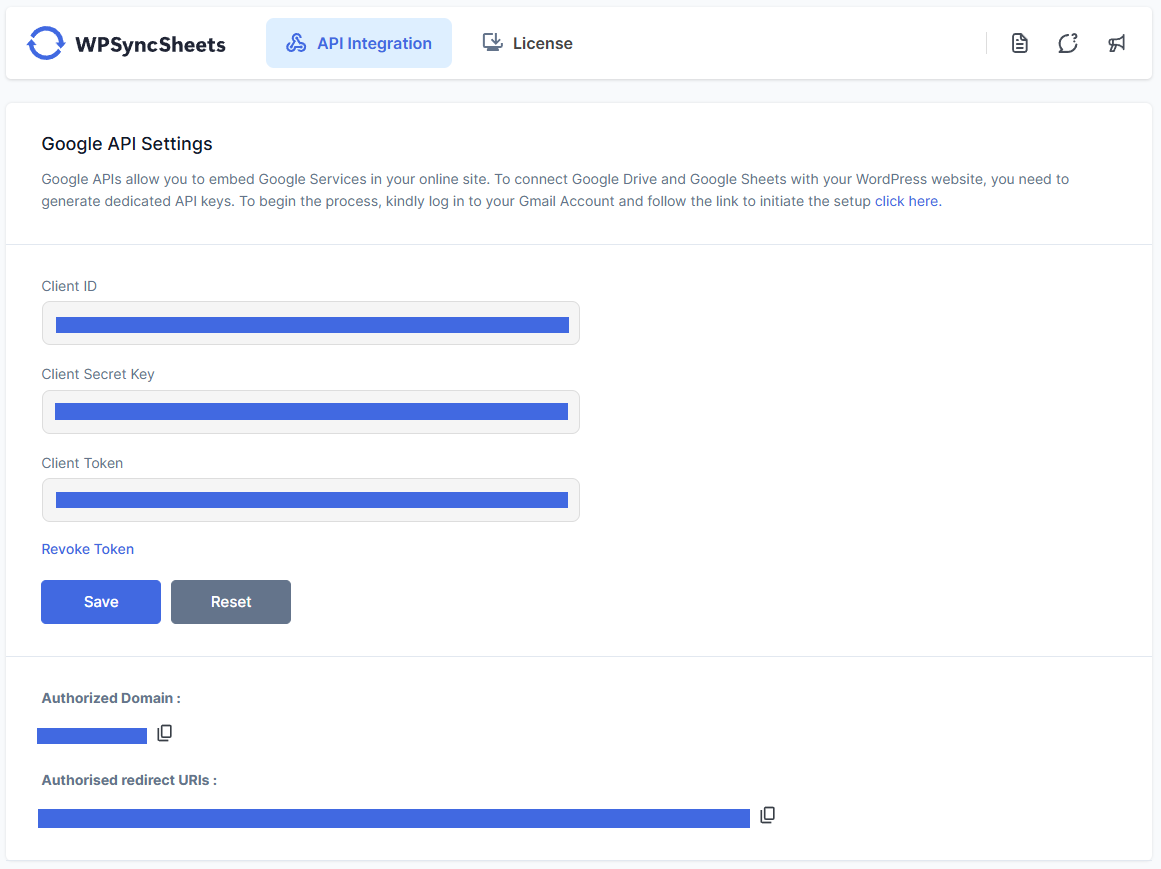
Congratulations, you’ve successfully integrated Google Drive and Sheets with Gravity Forms.
Step 4: Create a New Form or Edit Existing Gravity Forms
Once you authorize your Google Sheets accounts with Gravity Forms, you can create new forms or choose from the existing ones to save form entries in Google Sheets.
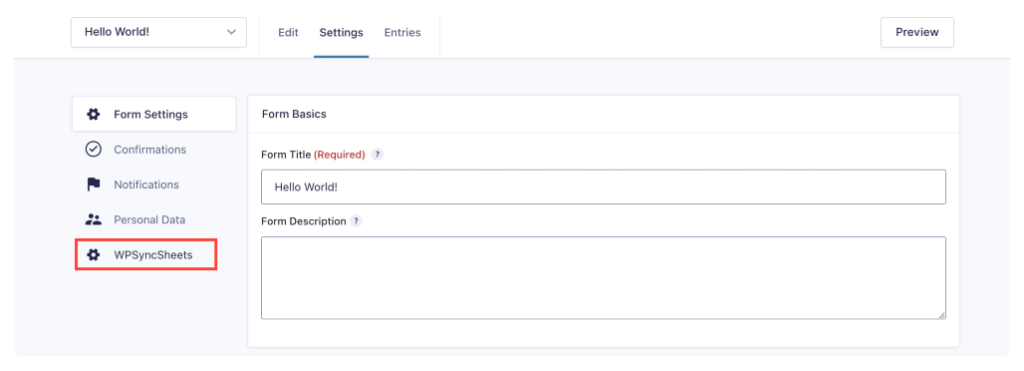
Choose your form and go to the Gravity Forms settings page.
On the settings page, click on the WPSyncSheets tab.
Step 5: Configure WPSyncSheets for Gravity Forms Feed Settings
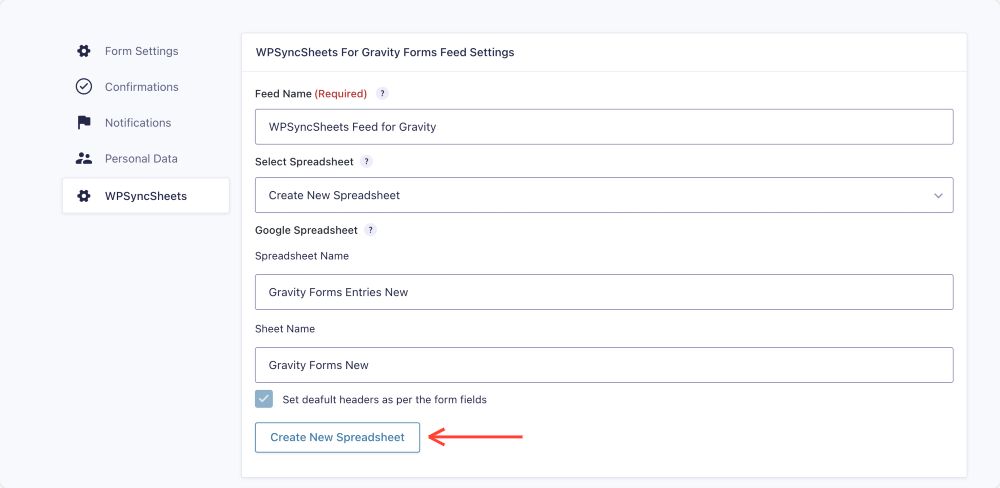
On the next screen, you’ll find an option to configure WPSyncSheets for Gravity Forms feed settings.
First, you need to add your Feed Name and select the Spreadsheet.
If you want to create a fresh spreadsheet for your form entries, you can do that too by choosing to Create New Spreadsheet from the drop-down options.
You need to add further details such as Spreadsheet Name and Sheet Name.
Once you are done with adding all the details, click on the Create New Spreadsheet button.
You will be presented with other feed settings as soon as you create your new sheet.
Let’s understand these options in more detail.
- Edit/Update: Admin can enable this option so that every time they change Gravity Forms entries, it will also affect the Google Sheet entries with the same row.
- Map Fields: Enabling this feature maps the row within the google spreadsheet whenever form data is inserted by associating left-side sheet headers with right-side form fields.
- Sync all existing entries: As the name says, you can synchronize your existing Gravity Forms entries within the selected spreadsheet with the selected sheet.
- Freeze Header: You can freeze the header in the Google Sheets directly from the WordPress dashboard.
- Conditional Logic Settings: This feature allows you to set conditionals for particular fields. If the conditions match, data will be passed to Google Sheets; otherwise, no entry will be added.
Once you configure WPSyncSheets, remember to click on the Save Settings button.
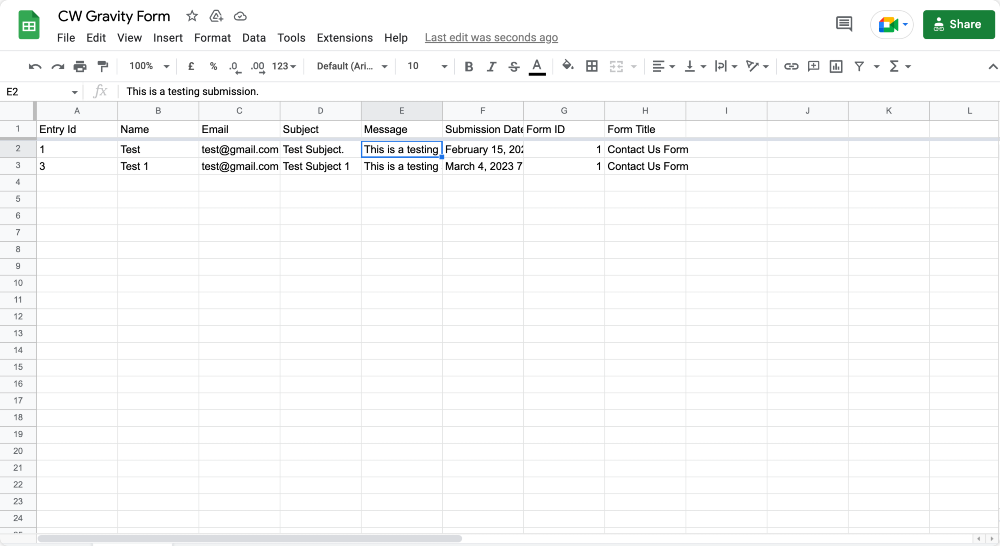
And you’re done! This is how easy it is to connect Gravity Forms to Google Sheets using WPSyncSheets.
Wrapping Up!
This complete guide covers the step-by-step process of connecting Gravity Forms with Google Sheets using the WPSyncSheets for Gravity Forms.
Integrating Gravity Forms with Google Sheets can streamline your data collection and management process.
With the help of WPSyncSheets, you can easily set up a connection between your Gravity Forms and Google Sheets accounts, allowing you to export form submissions to your preferred spreadsheet platform automatically.
If you’re using a WordPress contact form builder other than Gravity Forms, you might be interested in checking our other plugins as well:


