

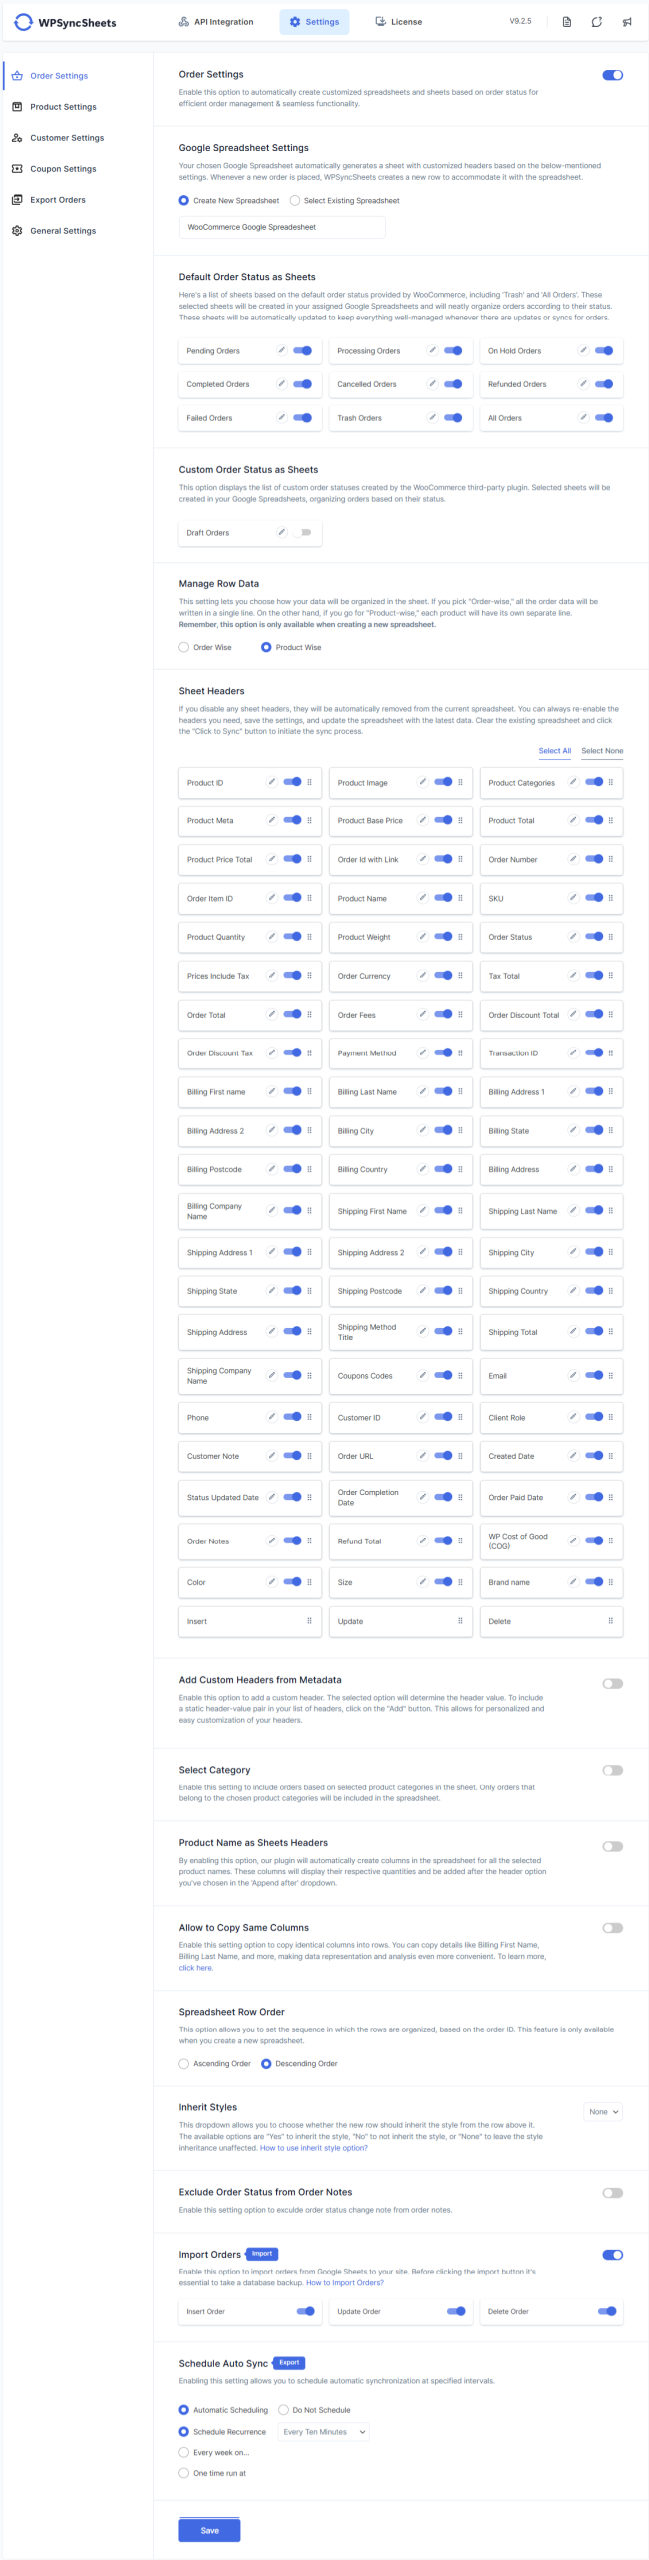
WPSyncSheets For WooCommerce, which is on the top tier of the plugin to customize your WooCommerce orders which are important for your business to manage flexibly within one single google spreadsheet. User can easily export all the new/existing WooCommerce orders to google spreadsheet.
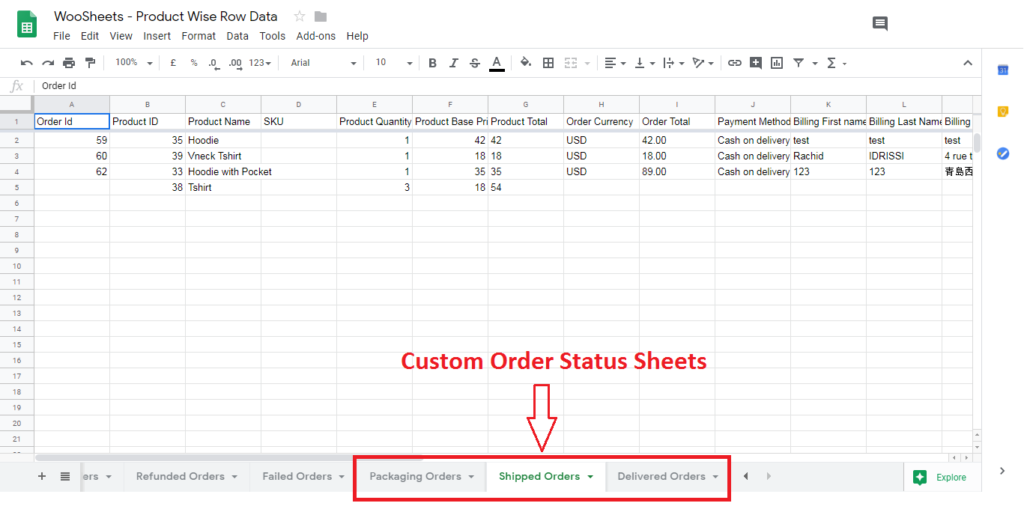
Each order status will automatically create separate sheets and orders based on the order id, also has compatibility with the custom order status which adds the new order status to our spreadsheet and also includes the data added by the third party within the sheet.
We have integrated some of our plugins with google sheets, our plugins involve managing orders and entries with google spreadsheet. We explore the idea of integrating WooCommerce orders with Google Spreadsheets. It would mean that any WooCommerce order that comes in, gets added to the Google Spreadsheet.
What You Need to Connect Elementor to Google Spreadsheet
Follow this tutorial and export WooCommerce orders to google spreadsheet, you’re going to need a few things :
WooCommerce – you need WooCommerce plugin to access the orders and here you don’t need any app such as Zapier integration, which is not at all essential.
Google Sheets access – if you have a Google account, you already have access to Google Sheets.
How to export WooCommerce orders to Google Sheet
It consists of two types of plugin setting i.e. Order Wise and Product Wise Plugin Setting.
Order Wise Plugin Settings have sheet headers as order wise. To view more sheet headers, click here.
Product Wise Plugin Settings have sheet headers as product wise. To view more sheet headers, click here
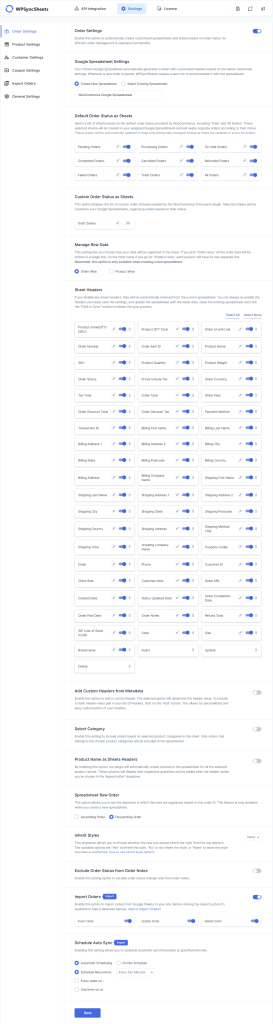
Order Wise Plugin Settings
This plugin setting has its sheet header according to the order selected by the user.
Default Order Status for any type of plugin setting are Pending Orders, Processing Orders, On Hold Orders, Completed Orders, Cancelled Orders, Refunded Orders, Failed Orders, Trash Orders. Different sheets are created for each order status.
Custom Order Status includes the status which are created by the third-party plugins. Some of them are Packaging orders, Shipped orders, Delivered orders.
For creating new spreadsheet, perform the following steps:
> WPSyncSheets For WooCommerce => General Settings
- Create New Spreadsheet.
- Select Create New Spreadsheet option from the given list in the select spreadsheet field.
- Enter the name of the new spreadsheet.
- In default order status, it shows the status which is set as default from WooCommerce. Each status indicates the different sheets in the spreadsheet. In case, if some of them are not useful, you can disable them too.
- The sheet headers will automatically get sorted as per the selected option in Manage Row Data section. Select all buttons will select all the sheet headers. You can disable some of them manually. If you want to disable all the sheet headers just click on the Select none button.
- When you click the save button, the spreadsheet will get updated and you can also view it by clicking the View Spreadsheet.
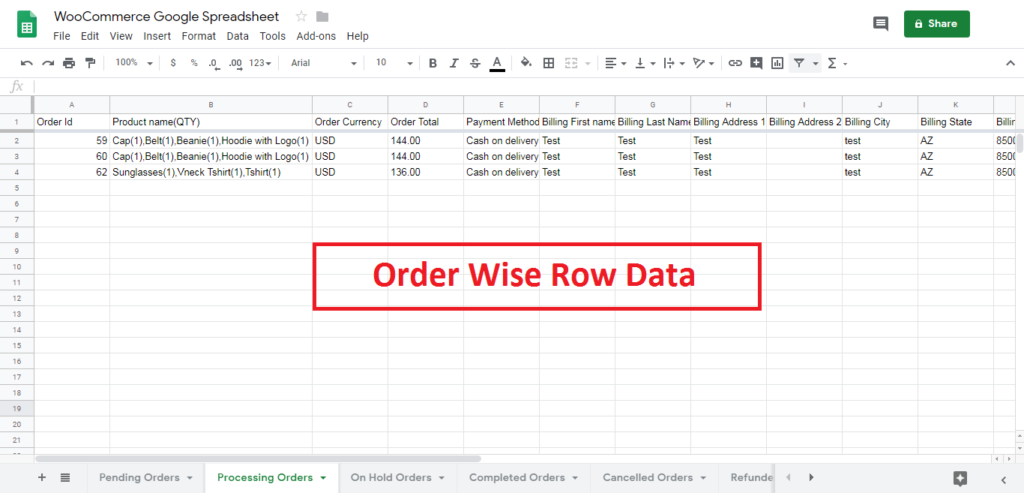
Updated Google Spreadsheet( Order Wise ).
After saving the above settings, the Order Wise spreadsheet is shown below.
Product Wise Plugin Settings
This plugin setting has its sheet header according to the Product id.
Pending Orders, Processing Orders, On Hold Orders, Completed Orders, Cancelled Orders, Refunded Orders, Failed Orders, Trash Orders are default order status. Custom Order Status includes the status which is created by the third-party plugins. Some of them are Packaging Orders, Shipped Orders, Delivered Orders.
For creating new spreadsheet, perform the following steps:
> WPSyncSheets For WooCommerce => General Settings
- Create New Spreadsheet.
- Select Create New Spreadsheet option from the given list in the select spreadsheet field.
- Enter the name for the new spreadsheet.
- In default order status, it shows the status which is set as default from WooCommerce. Each status indicates the different sheets in the spreadsheet. In case, if some of them are not useful, you can disable them too
- The sheet headers will automatically get sorted as per the selected option in Manage Row Data section. Select all buttons will select all the options. You can disable some of them manually. If you want to disable all the sheet headers just click on the Select none button.
- When you click the save button, the spreadsheet will get updated and you can also view it by clicking View Spreadsheet.
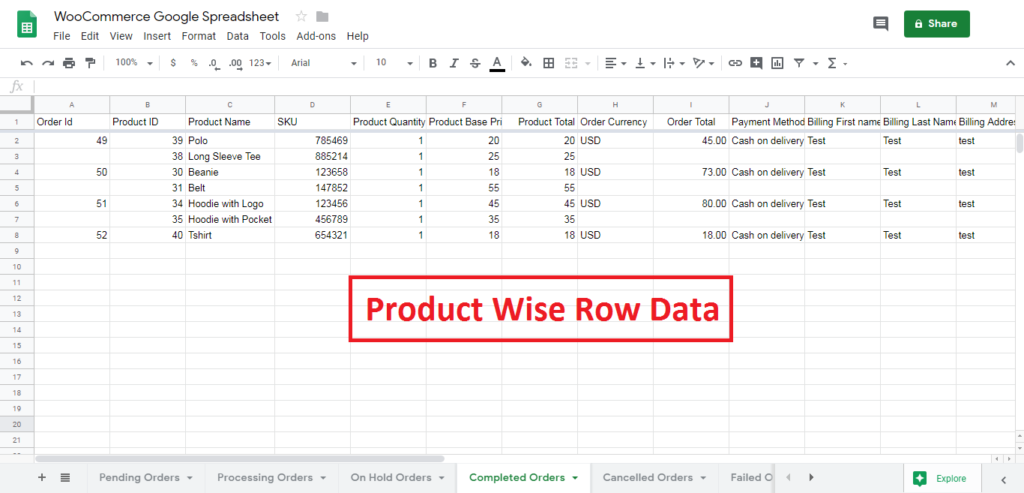
Updated Google Spreadsheet( Product Wise ).
After saving the above settings, the Product Wise spreadsheet is shown below.
Custom Order Status
In custom order status, it shows the status which is created by the third-party plugin.
- Custom Order Status.
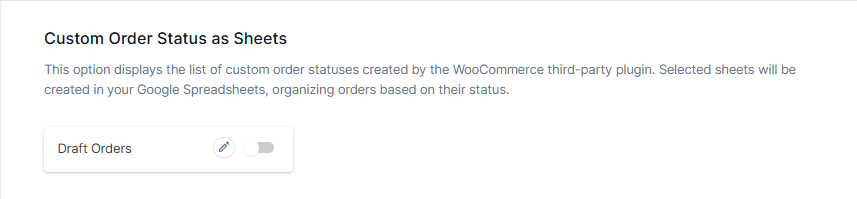
Below figure shows that the status created using third party plugin can be viewed in spreadsheet
General Settings
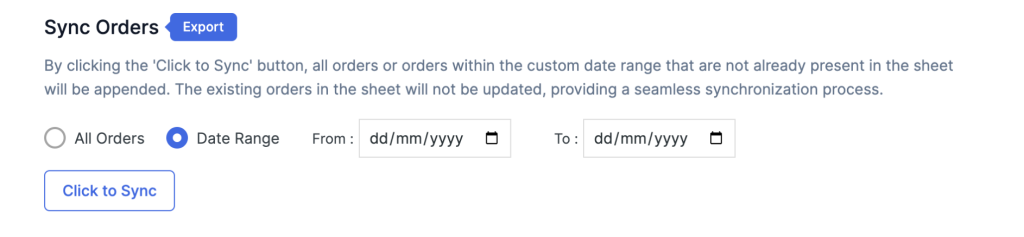
1. Sync all existing orders
When a user clicks on a button called Click to Sync then it will synchronize / add existing WooCommerce orders within the selected spreadsheet with selected sheet.
2. Freeze Headers
When the user wants to freeze the first row i.e., header (title) row while scrolling down the page it will remain on top the page when the user enables this button.

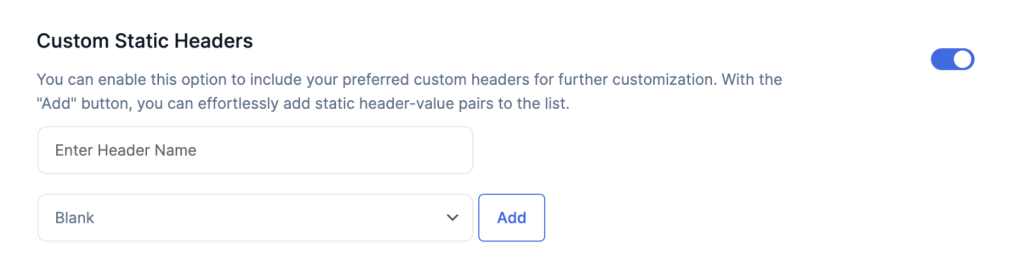
3. Add Custom Static Headers
Enable this button when you want to add a header of your choice. It will take the value manually by the user. So, when you create a static header the value will be passed by users only.
4. Allow To Copy Same Columns
When you enable Allow to copy the same Columns, the data which is available for it will directly get copied for the remaining items.

Note: Exclude – Order Total and Shipping Total – for the purpose of arithmetic operation.
Before enabling Allow to Copy Same Columns:

After enabling Allow to Copy Same Columns:

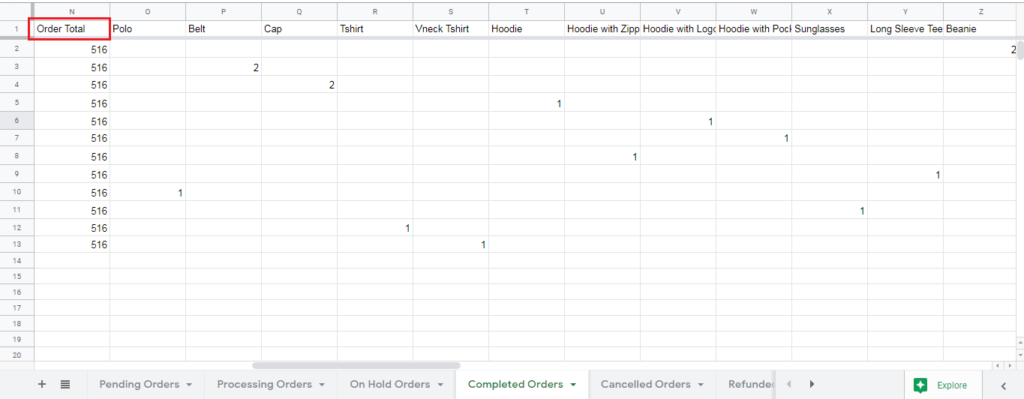
5. Product Name As Sheets Headers
If you want to set the product name as sheet header then enable the product name as sheet headers button. The columns will automatically be created. Appending after dropdown will add all the product names in-between as per your dropdown selected in the spreadsheet.
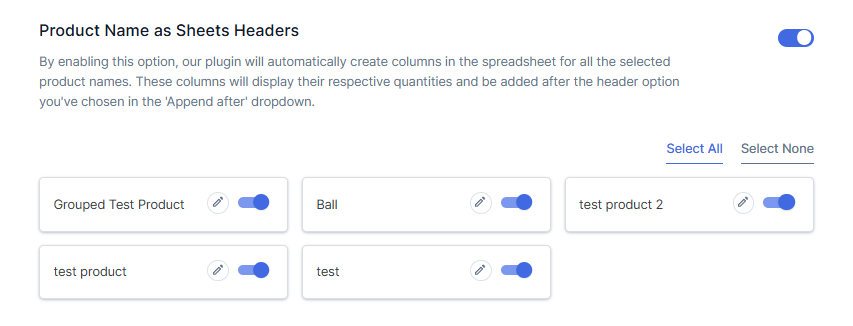
For example, here Order Total is selected in the Append After list so the columns will get appended after that.
6. Export Orders
Export all orders of specific product categories within a new spreadsheet. Export all orders or Export orders to specific date range orders within a new spreadsheet.
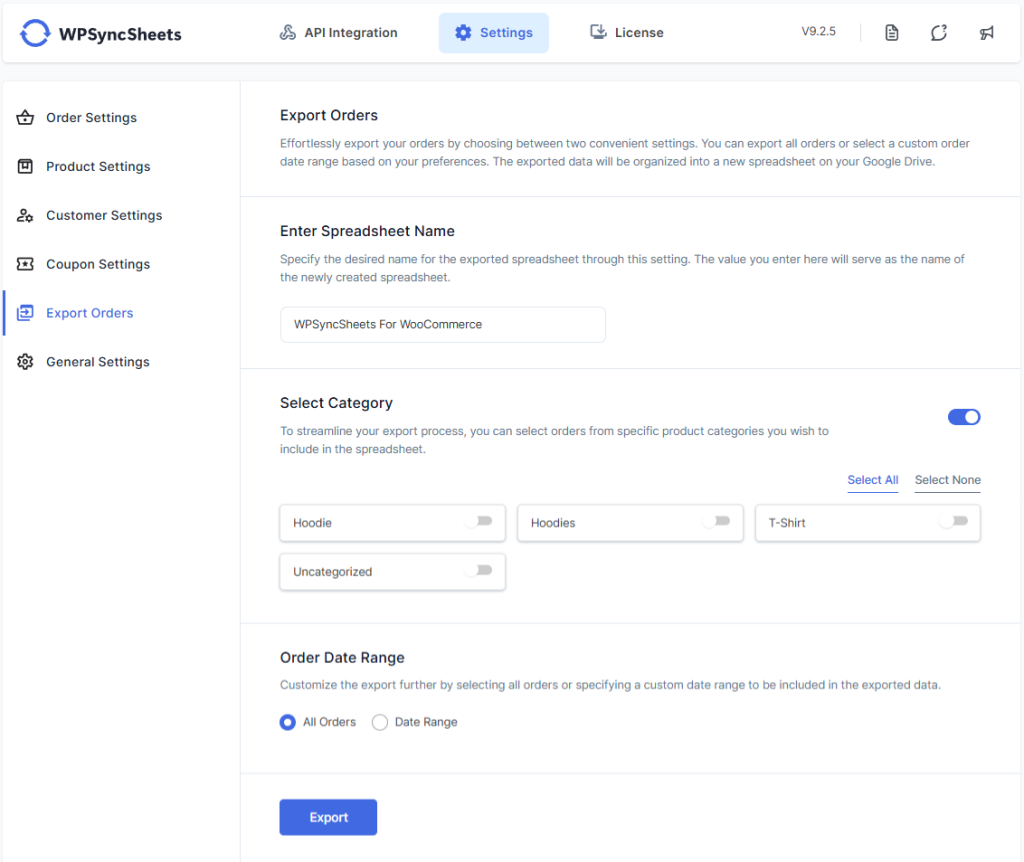
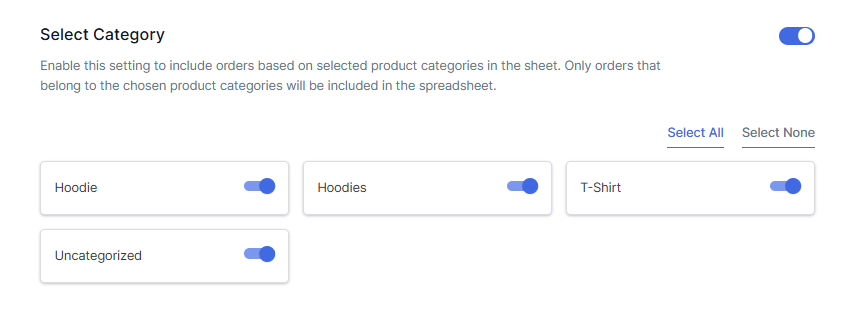
7. Product Category Filter
When a user selects the product categories from the general settings page then it will automatically get added to WooCommerce orders into the Google Spreadsheet, if disabled then it will not place any order for that particular product categories.
8. Background Row Color
This feature allows users to add background row color in odd & even manner, it is calculated as per their order id.

No FAQs found.


